Follow this guide for multiple methods to connect to the Hisense TV Screens.

From the home page of the TV screen, you can select Hisense Share to see a connection guide with tips on screen.
This explains the different methods you can use to connect your PC to the display.
See my detailed instructions below for these methods.
Go to this website: Downloads. Hisense Commercial Display (hisense-b2b.com)
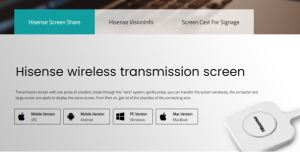
Download the app version you need, and let it install.
Open the app and you will see a list of displays automatically identified on the network, as well as a “Please Enter Screen Sharing Code” box.

This gives you multiple ways to connect.
The bottom of this window lists all the available displays it can find on the network.
The screen you are looking for should be named appropriately, please reach out to IT if any need renaming. If you find your display, click connect from there and it will prompt your connection settings.
If your screen is not on this list, type the screen sharing code that appears on the TV into the top box.
NOTE: This method only works when connected to the Skagerak-Teachers WiFi network. This means students are unable to connect through the ScreenShare App.
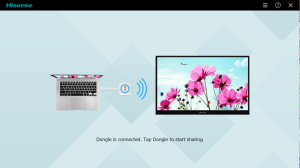
Insert the Hisense dongle into the USB port of your laptop.
The drivers and application should start installing automatically.
You might need to open HiShare like a removable drive and run the installer manually. Follow the prompts to install everything. You should only need to do this step the first time you connect.
When it is finished installing, push the big button on the Dongle to connect.
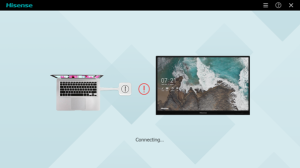
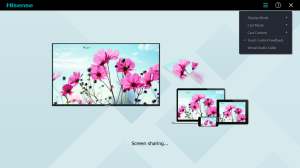
Now your laptop screen will be showing on the TV. Click the menu at the top right for the main control settings.
Use this method only if the first 2 do not work for you.
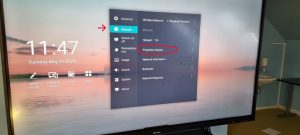
Open the Settings on the TV and go to the Network tab.
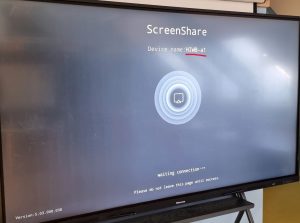
Choose Project Display from this menu, and the screen will start to act like our regular projectors. This means you can connect/cast to it the same way as other classrooms with the wireless projector displays.
Press Windows + K to connect to an external display, and choose the correct device name to start sharing your screen.
If you want to connect to the screen with your phone rather than a laptop, follow these instructions:
Open the “Hotspot” of the big screen, open the “Super Taskbar”.
You should see a QR code here.
(NEED PIC)
Scan the QR code and download the right Share app for your device. IOS devices can use Airplay to transmit, AFTER installing the app.
Here are some things you can do when connected to your phone:
- Click Wireless screen transmission to show your phone screen on the TV.
- Invert screen transmission will show the TV screen on your phone.
- Click + at the bottom right to operate the large screen with your phone.
- Wireless Camera can show the view of your phone’s camera on the TV.
- Intelligent Remote Control allows you to use your phone as a remote to operate the TV.
(SOME PICS)
Once you are connected, you have access to a range of functions within the ScreenShare app.
I will update here some of the most useful features and some troubleshooting as things come up.
For example:
- You can Send a File to the screen once connected. So instead of sharing your whole screen, you can throw up an image or video for the class to see.
- You also get a bit more control of what to stream, for example cast just the contents of one window or application.
- You can control the sound, whether audio comes out of the TV or laptop speakers, what kind of sounds should play etc.
- You can adjust control settings, such as control your laptop via the TV or vice versa.